Help Docs Navigation
Blog Post
Blog posts are basic content. They can be used instead of newsletters or to complement newsletters, to provide store updates, or to share book suggestions and reviews. They are posted by date and usually contain tags indicating what the post is about. Books or other products can be added to a blog. Anyone with a Blog Author, Content Editor, or Site Administrator role can create a blog post.
Note: Blog Author roles are granted to user accounts. Any user account can be assigned this role. Only a Site Administrator can assign this role to a user.
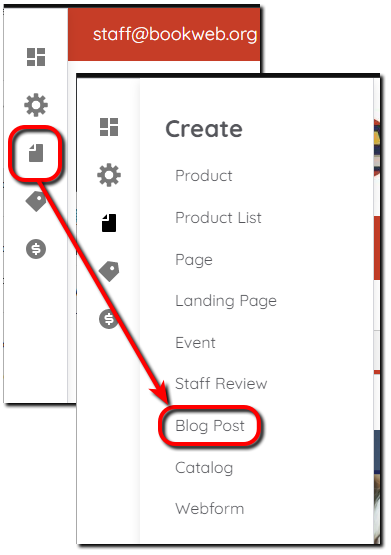
Select Create in the left menu, then select Blog Post to start a new blog post.

Create Blog Post
All components and fields with a red asterisk (*) are required.
Title
Enter a Title for the post.
Summary
Select Edit Summary to add a custom summary. Otherwise, part of the full text is trimmed and used as a summary.
Body
Enter the blog post in the Body using the text editor [Text Editor].
Blog Tags
Start typing to see auto-suggested blog tags.
Select create blog tags here to create tags.
- Enter a Name for the tag.
- Enter a Description of the tag.
- Designate Relations for the tag.
- Select Parent terms the tag falls under or leave at <root> if the tag is stand-alone.
- Enter a Weight that determines the order the tag appears in. When multiple tags are added to a post, tags display in ascending order by weight.
- Create a custom URL alias by unchecking Generate automatic URL alias and entering the alternate path.
- Published is checked if the tag has been published to the site.
- Select Save to save the tag. Select Save and go to list to save the tag and view the tags list where you can select + Add term to add more tags or select Delete next to an existing tag to remove it.
Use the arrows to rearrange tags. Select Remove to delete a tag. Select Add another item to add more tags.
Related Products
Add Related Products by entering the ISBN, book title, or product name. Use the arrows to rearrange products. Select Remove to delete products from the post. Select Add another item to add more products to the post.
URL alias
Use this setting to alter the URL of the page. Uncheck Generate automatic URL alias then enter the custom URL alias. External links cannot be used.
Published
Leave Published selected to publish the blog post to your site. Unselect if you don’t want the blog post to publish yet.
Preview
Select Preview to preview how the post will display on the site. You can switch between Full and Teaser View mode. Select Back to content editing in the upper left to return to Edit mode.
Save
Select Save to save the post.
