Help Docs Navigation
Customer Roles
Customer roles are new roles that you assign to customers’ user accounts on the website. Customers with certain roles can be given special privileges like special discounts, shipping rates etc. For example, customers with roles like teachers, frequent buyers can have exclusive discounts and shipping rates. A customer can have more than one role.
Site Administrators can configure customer roles.
All components and fields with a red asterisk (*) are required.
Create Customer Roles
Create Customer Roles for specific groups of customers.
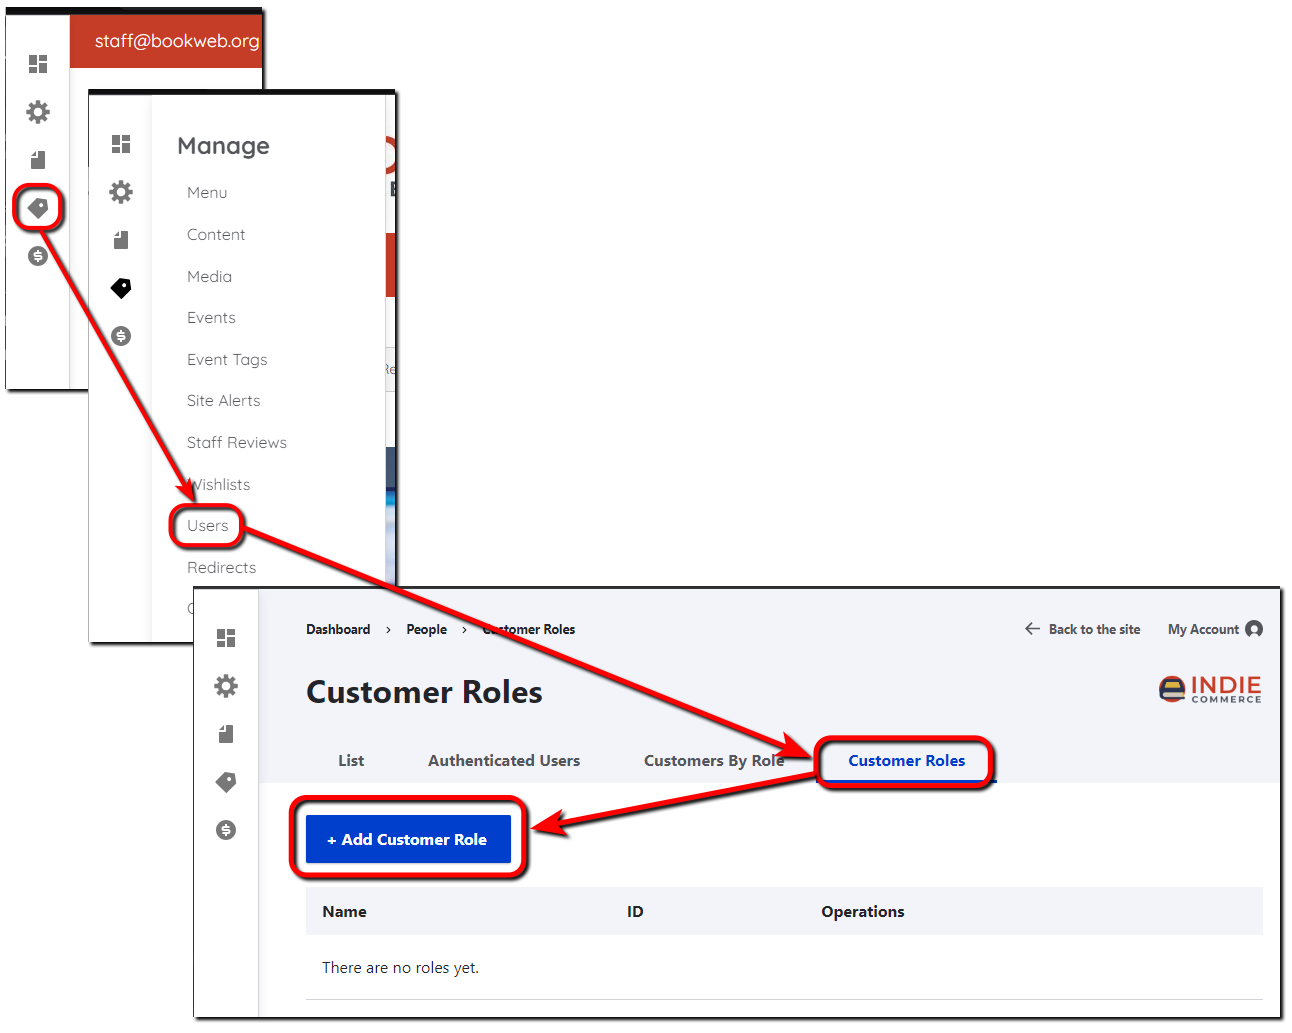
- Select Manage in the left menu, then Users.
- Select the Customer Roles tab.
- Select + Add Customer Role.

- Enter a Role Name that matches the role. For example, ‘Teacher’ for teachers you want to give exclusive discounts.
- Select Save to save the role.
Add Customer Roles to Users
Once you’ve created customer roles, add them to users. The roles assigned to a user display in the Roles column.
- Select Manage in the left menu, then Users.
- Under the List tab, select Edit in the Operations column for the user you want to update with a customer role.
- Scroll to Roles and select the customer role you want for the user.
Scroll down and select Save to save the changes.
View Customers By Role
View a list of customers based on assigned customer roles under the Customers By Role tab.
- Select Manage in the left menu, then Users.
- Select the Customer By Role tab. All users assigned a customer role display.
Select a specific role from the Customer Roles menu, then select Apply to view only users with that role.
Bulk Update Customer Roles
Add customer roles to multiple users at once using bulk update. A customer can have more than 1 role.
- Select Manage in the left menu, then Users.
- Select the Customer By Role tab.
- Select + Bulk Update.
- Select Assign for Operation to assign a role. Select Remove to remove a role.
- Select a Role from the menu.
- Enter email addresses in Users list or select Choose File to Upload CSV file with email addresses.
Select Update customers.
Create Promotions by Customer Roles
In this example, you’ll create a promotion that gives teachers 20% off their orders based on the Teacher customer role.
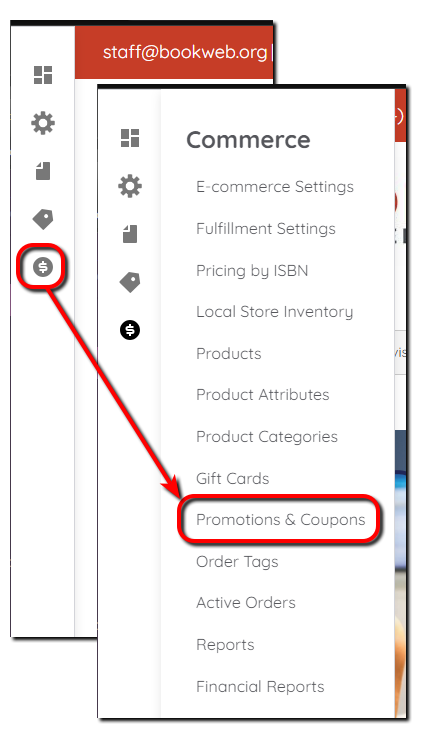
- Select Commerce in the left menu, then select Promotions & Coupons. Select + Add promotion.

- Enter a Name that describes the promotion. For this example, enter ‘20% Off For Teachers’.
- Enter a Display name that shows on the order instead of Discount. In this example, that could be the same as the name or ‘Teachers 20% Off’.
- Enter a Description that is for administrators, not customers. Include additional details or instructions for staff here.
- Select Percentage off the order subtotal for Offer type. This gives customers the Percentage off their order subtotal that you enter. In this case, enter 20.
- Next, add a Condition to apply the promotion only to the Teacher Customer Role by selecting Customer role under Customer. Then select Add and enter select the Allowed roles. In this case, select Teacher.
- Leave All conditions must pass selected.
- On the right, leave the Status on Enabled to activate the promotion. Set to Disabled to store the promotion for later.
- Select Dates the promotion is valid. To keep the promotion open indefinitely, don’t set an end date, but you’ll need to disable the promotion manually to end it.
- Don’t select Require a coupon to apply this promotion in the Coupons section on the right.
- Set Usage limits using Total available and Total per customer.
- Set the Compatibility with other promotions to specify if the promotion can be used with other promotions.
- Select Save to save the promotion.
Create Shipping Method by Customer Role
Create a custom shipping method for the Teacher customer role that gives teachers a discounted shipping rate.
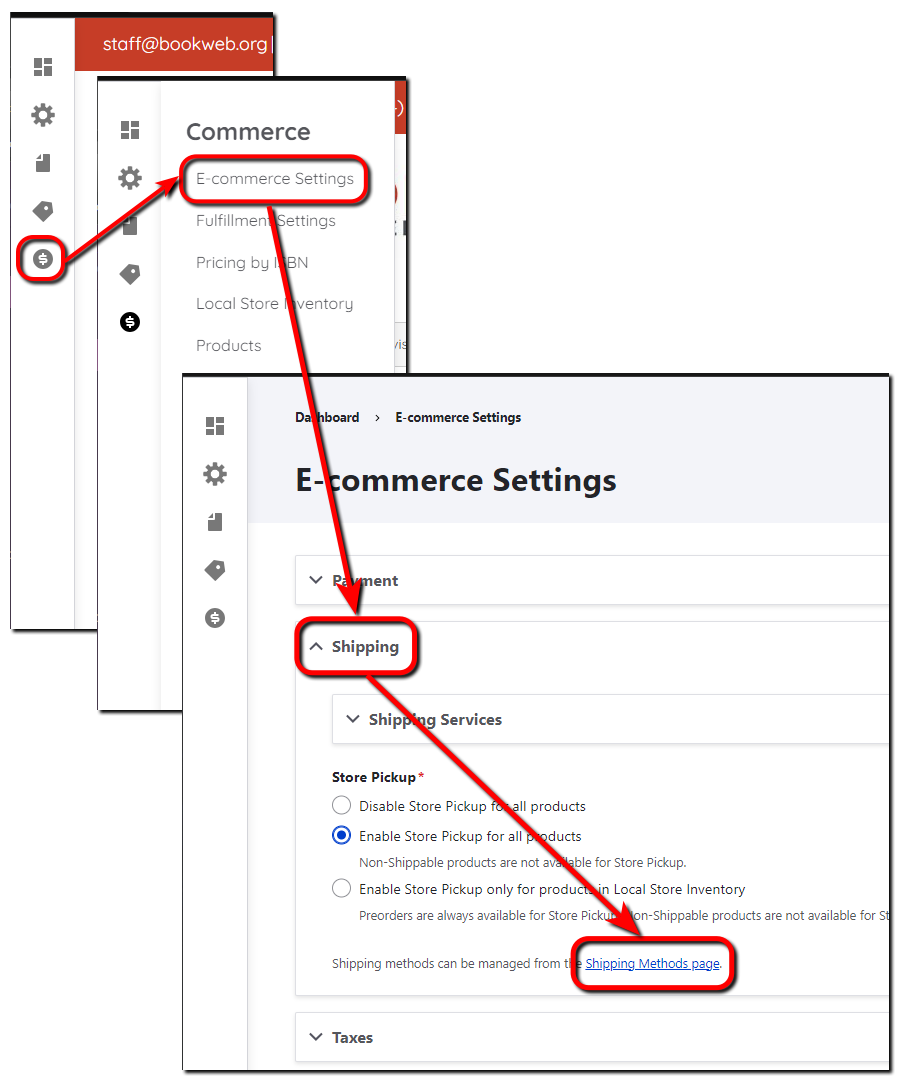
- Select Commerce in the left menu, select E-commerce Settings, select Shipping, then select Shipping Methods page.

- Select + Add shipping method.
- Enter ‘Teacher Shipping’ for Name.
- Select Flat rate for Plugin.
- Enter ‘Flat rate’ for Rate label.
- Leave Rate description blank.
- Enter 4.95 for Rate amount.
- Add a Condition to offer the shipping method only to the Teacher Customer Role by selecting Customer role under Customer. Then select Add and enter select the Allowed roles. In this case, select Teacher.
- Leave Enabled selected so the shipping method displays during checkout.
Select Save to save the new shipping method.
