Help Docs Navigation
Store Merchandise (Tier 2 only)
Store merchandise is anything sold at stores that is not books from the IndieCommerce Book Database System. This page covers products that can be shipped. See Non-shippable Store Merchandise for merchandise like event tickets that are delivered via email, memberships, and other items that don’t require shipping.
Grouping store merchandise by categories makes merchandise easy to manage. You’ll want to plan the items you want to upload and group them into categories before starting.
Use these instructions to add any store merchandise that doesn't require variations like size and color. See Store Merchandise with Variations for instructions on adding and configuring store merchandise like clothing.
All components and fields with a red asterisk (*) are required.
Add Product Category
Product categories are terms used to group products of the same type, for example, toys, board games, and candles. All products created on the website must belong to at least one category. Product categories can help with configuring sales tax, shipping rates, and payment methods, so it is important to group products in the proper category or term. Product categories determine similar products displayed at the bottom of the product page. When customers view a product, they can select the category below the title and see all the products available in that category.
- Select Commerce in the left menu, then select Product Categories.

- Select + Add term.
- Enter a Name for the term.
- Select Taxable if you want to apply sales tax to products in the category. This overrides the setting for Store Merchandise under Taxes for this category.
- Select Always Available for Purchase if you want items in the category available to add to carts even if they’re not in stock. This overrides default settings under Local Store Inventory Settings [Local Store Inventory Settings] and LSI for the product. If you override LSI for the product, customers see a Special Order when they view the product.
- Expand Relations to modify the term hierarchy. Terms maintain the taxable and available for purchase settings of the parent term.
Add Store Merchandise Products
Next, you’ll add store merchandise products and associate them with the terms. Adding store merchandise enables a Merchandise option in Search that customers can use to search only store merchandise.
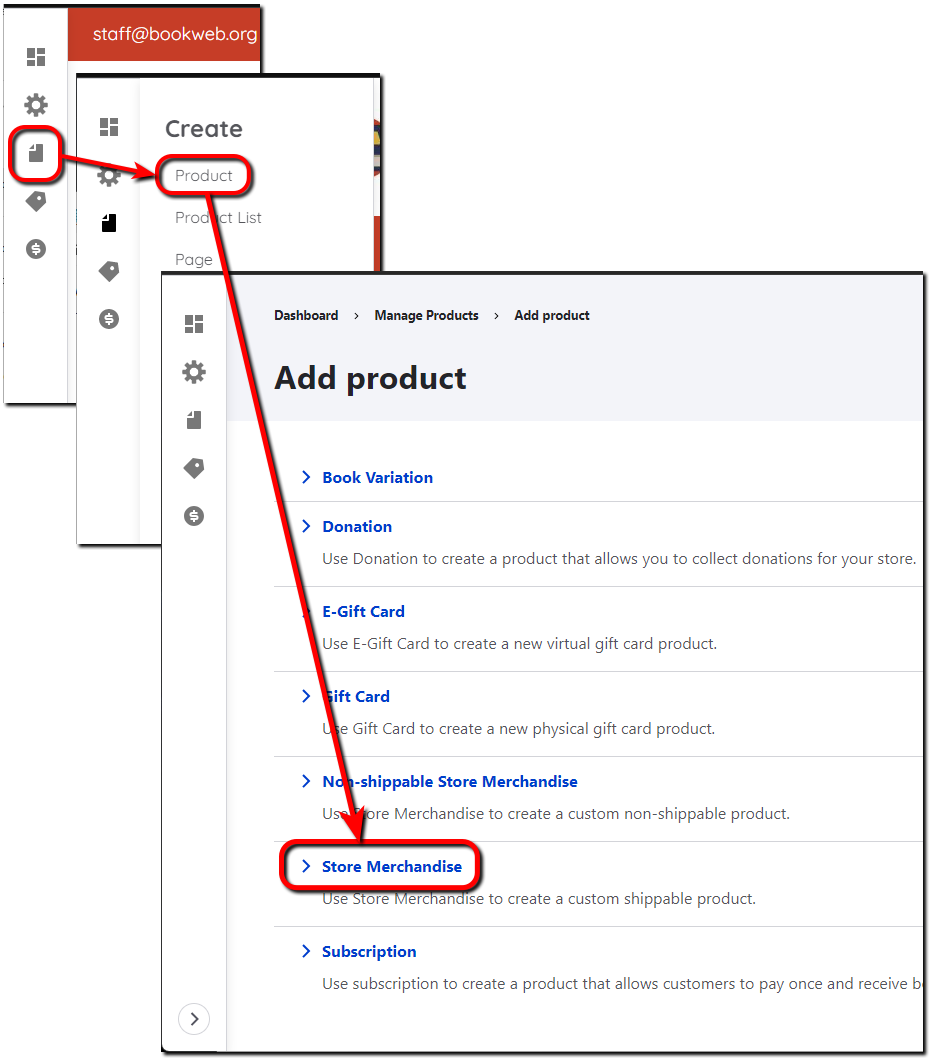
- Select Create in the left menu, select Products, then select Store Merchandise.

- Enter a Title that tells customers what the product is.
- Start typing the Product Category added previously, then select the term to autofill. Select Add another item to add additional terms if the product falls under more than one category.
- Enter a Description that tells customers more about the product.
- Enter a SKU that is unique to the product.
- Add Images so customers know what the product looks like. You can add up to five (5) images for each product. You must add at least one (1) image. Be sure to make the images the same size so the carousel moves smoothly through the images.
- Enter Product Characteristics. Dimensions are optional, but Weight is required for shipping purposes.
- Enter a Price for the product. You can also enter a Custom shipping rate percentage to increase or decrease the shipping rate for the product. You can Provide a list price and enter a List price and a separate Price to indicate that the product is discounted.
- Leave Published selected to publish the store merchandise to your site. Unselect if you don’t want to publish the merchandise yet.
- Select Save to save the store merchandise.
Use Conditions for Store Merchandise
You can add conditions anywhere they are available that target store merchandise. This example uses conditions to exclude media mail as a shipping method if the order contains store merchandise. You can also add conditions for payment methods, promotions, coupons, and anywhere else they are available.
Add Condition to Media Mail
Exclude media mail as a shipping option if the order contains any store merchandise.
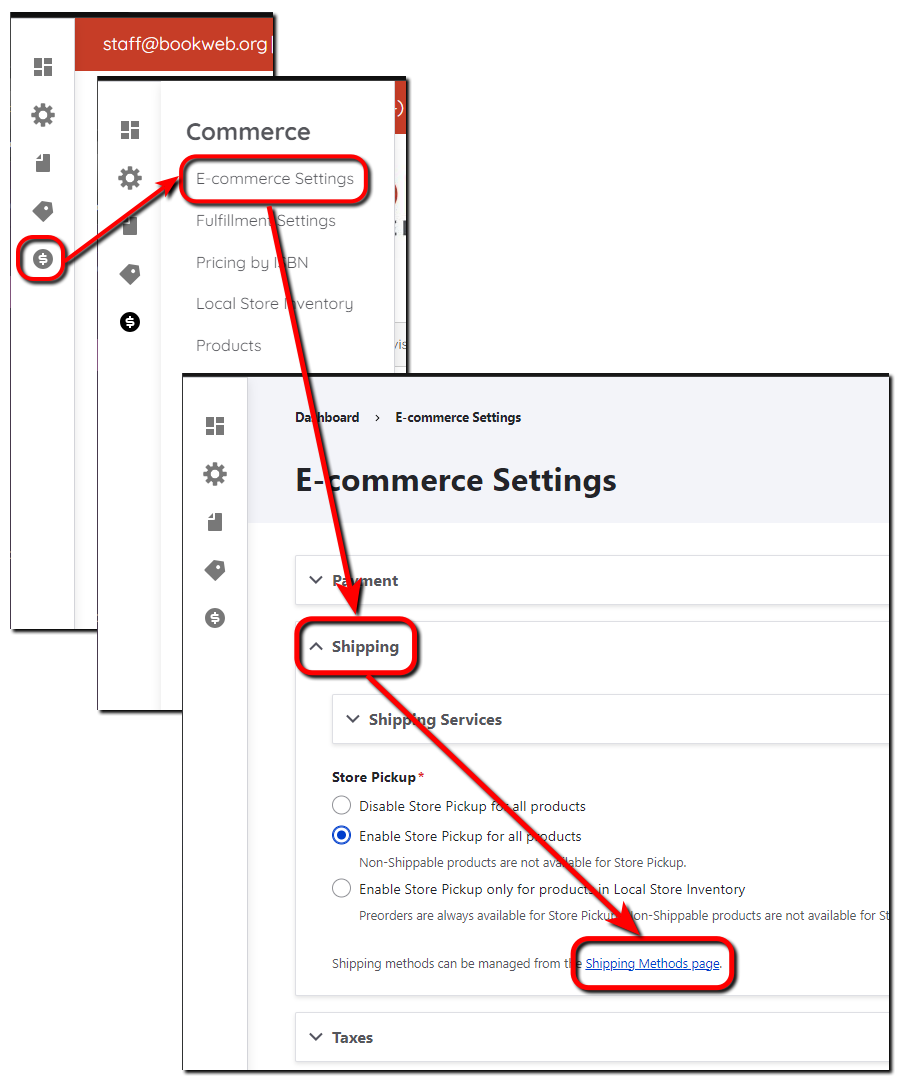
- Select Commerce in the left menu, select E-commerce Settings, expand Shipping, then select Shipping Methods page.

- Select Edit in the Operations column for Media Mail.
- Scroll down to Condition and select Product type from the menu, then select Add.
- Select Store Merchandise and Negate to remove media mail as a shipping method if the order contains store merchandise.
- Select Save to save the changes.
You can also exclude media mail if the order contains store merchandise in a specific category by selecting Product category and Add, then selecting the category of merchandise that makes the order ineligible and selecting Negate. You can do the same with Product and exclude media mail if the order contains specific products.
Store Merchandise with Variations
In this example, you’ll create clothing with variations for size, color, and sleeve length. Use the steps above to add a product category, such as T-shirts. Then, you’ll add the T-shirts with the variations. When customers view the T-shirt products, they’ll see options for size, color, and sleeve length if you’ve added those variations.
Manage Attributes
Attributes for ‘Size’ and ‘Color’ are available by default. You can add one additional configurable attribute.
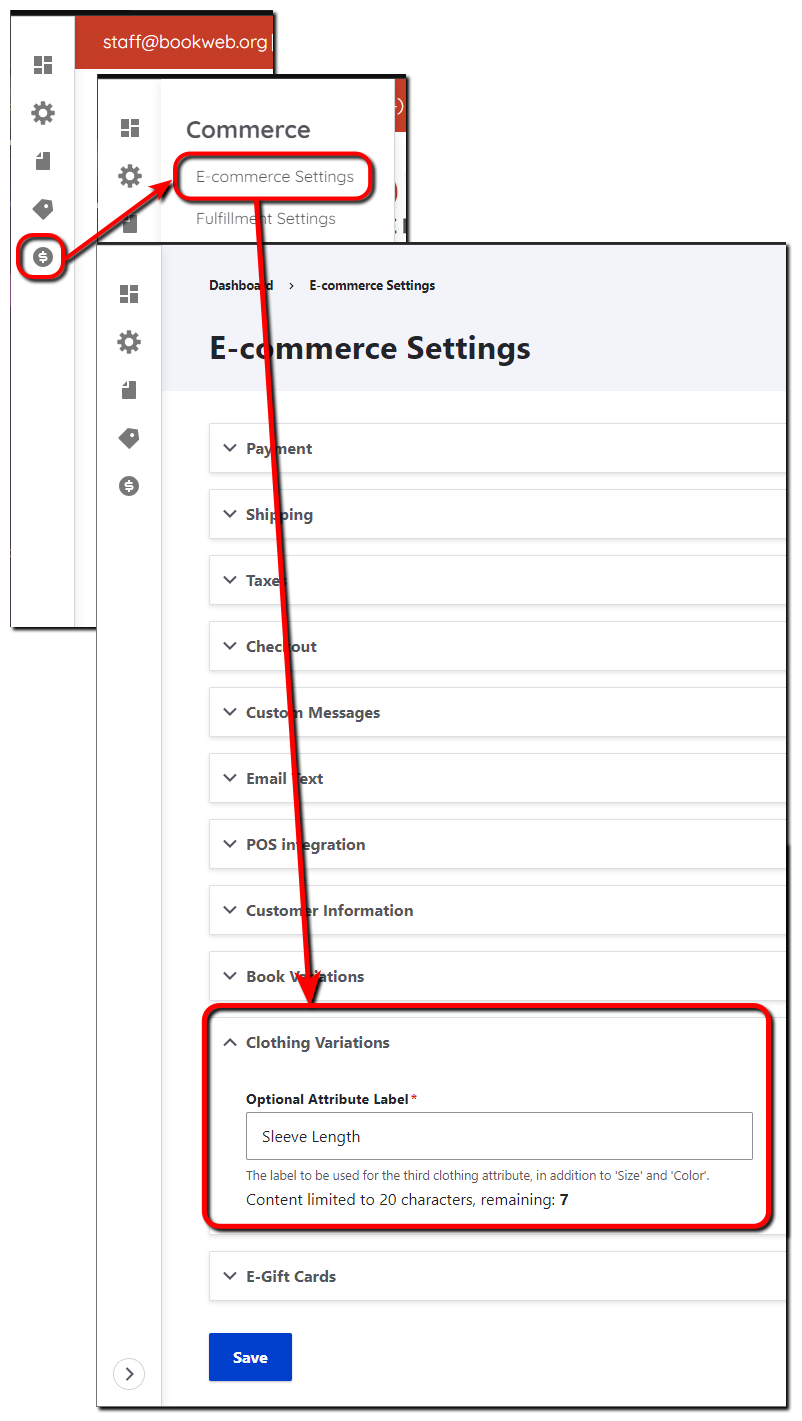
- Select Commerce in the left menu, then select E-commerce Settings.
- Expand Clothing Variations.
- Enter the Optional Attribute Label. For example, ‘Sleeve Length.’

- Select Save to save the changes.
Each attribute can have multiple values. You can add, remove and reorder these values.
- Select Commerce in the left menu, then select Product Attributes.
- Select Edit under Operations.
- Add Value, Remove, reorder or Reset to Alphabetical
Note : Do not remove values already used in variations
Add Store Merchandise with variations
Add store merchandise using Clothing Variations.
- Select Create in the left menu, select Products, then select Store Merchandise.
- Enter a Title that tells customers the type of clothing.
- Start typing the Product Category added previously, then select the term to autofill.
- Enter a Description that tells customers more about the clothing.
- Select Clothing Variations to add color, size, and the additional attribute configured above.
- Enter a SKU that is unique to this variation. For example, enter ‘med-black-shirt,’ which combines the size and color of a shirt.
- Select a Size, Color, and the additional attribute if needed.
- Provide a Description specific to this variation.
- Add Images for this variation.
- Enter Product Characteristics. Dimensions are optional, but Weight is required for shipping purposes.
- Enter a Price for the product. You can also enter a Custom shipping rate percentage to increase or decrease the shipping rate for the product. You can Provide a list price and enter a List price and a separate Price to indicate that the product is discounted.
- Select Create Variation and the variation displays.
- Select Save and add variations.
- Select + Add variation to add additional shirt variations using steps 6 through 11 and select Save after step 11.
