Help Docs Navigation
Landing Page
Landing pages are content pages that include product lists and calls to action. They have more design elements than a basic page. Use landing pages to highlight related content and link to more related content.
Site Administrators and Content Editors can create, edit, and remove landing pages.
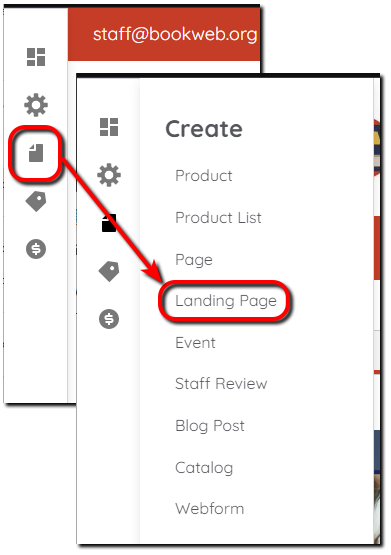
Select Create in the left menu, then select Landing Page to create pages.

Create Landing Page
All components and fields with a red asterisk (*) are required.
Page Title
Enter the Page Title that displays at the top of the page.
Introduction
The top section of the page is an introduction that describes what the landing page is about. It can have a title, text, and image. The introduction isn’t required but helps customers understand what to expect on the page.
Conclusion
This conclusion section gets highlighted on the landing page below product lists. The conclusion isn’t required but gives customers more information to keep them interested in the landing page topic and related areas of your website.
Product lists
You can include up to 5 product lists. You can add new product lists or include existing ones. Tier 2 stores can have store merchandise in their product lists.
Add new Product list
You can add new product lists to use on the landing page.
- Select Add new Product list.
- Enter a Product list title to display with the list.
- Enter a Description of the product list.
- Enter Products by ISBN, book title, or product name, and select the product from the results. Use the arrows to move products around in the list. Select Add another item to add more products to the list. Select Remove to delete products from the list.
- Select Published to publish the list.
- Select Generate automatic URL alias to automatically create an alias or enter a custom URL alias.
- Select Create Product list.
Add existing Product list
Select previously created product lists.
- Select Add existing Product list.
- Choose Select product lists.
- Select the product lists to add to the page, then choose Select product lists at the bottom of the available product lists.
Calls to Action
You can include up to 4 Calls to Action on the landing page. You can create a new CTA or include existing CTAs.
Add new Call To Action
Add new Call To Action allows you to create a new Call To Action.
- Select Add new Call To Action.
- Enter a Name.
- Enter a Call to Action Title.
- Enter a Call to Action Subtitle.
- Enter a URL for the Call to Action Link by typing the title of a piece of content and selecting it or entering an internal path. Enter <front> to link to the front page, <nolink> to only display the link text, or <button> to display keyboard-accessible link text only. Enter the Link text that is short and suitable for buttons.
- Select an Image for the Call To Action. Select Choose File, navigate to the image, and select Open. Enter Alternative text used by screen readers and when the image doesn’t open. Crop image based on the CTA/Position combination. See Call To Action [Home Page#Primary Calls to Action] for more information about image sizes and CTA positions.
Add existing Call To Action
Add existing Call To Action allows you to configure existing Calls To Action.
- Select Add existing Call To Action.
- Choose Select Call To Action elements.
- Select the Calls To Action to include.
- Choose Select Call to Action.
- Use the arrows to reorder the Calls to Action.
- Use Edit to modify a Call to Action or Remove to delete it.
Search, social & schema
Customize the page’s Abstract in the upper right. Select Custom abstract to enter a short summary of 160 characters max.
URL alias
Select Generate automatic URL alias to automatically create an alias or enter a custom URL alias
Published
Leave Published selected to publish the landing page to your site. Unselect if you don’t want the landing page to publish yet.
Save
Select Save to save changes made to the landing page.
